Regardless of whether you have a Samsung Galaxy S22, S22 Plus or S22 Ultra, the time has come to perform a Wipe Cache Partition. This function, which Samsung smartphones have integrated, is called up via a special recovery menu and helps to optimise the device.
It is advisable to always perform a Wipe Cache Partition after an Android firmware update or in the event of serious software problems. Since only temporary cache files are deleted and rebuilt, you do not have to worry about losing your own data. If you would like to perform a Wipe Cache Partition on your Samsung Galaxy S22, the following instructions will show you the exact steps to do so:
How to perform a Wipe Cache Partition on your Samsung Galaxy S22
Since Android 11, it is necessary that you connect the smartphone with a USB cable and a power supply. So connect the Samsung Galaxy S22 to a computer, charger or power bank.
Now follow these steps.
1. Switch off your Samsung Galaxy S22 completely by navigating to the power menu and selecting "Switch off".
2. Now, with the device switched off, simultaneously press and hold the volume up button and the bixby/power button for a few seconds and then release both buttons when the android logo appears on your screen.
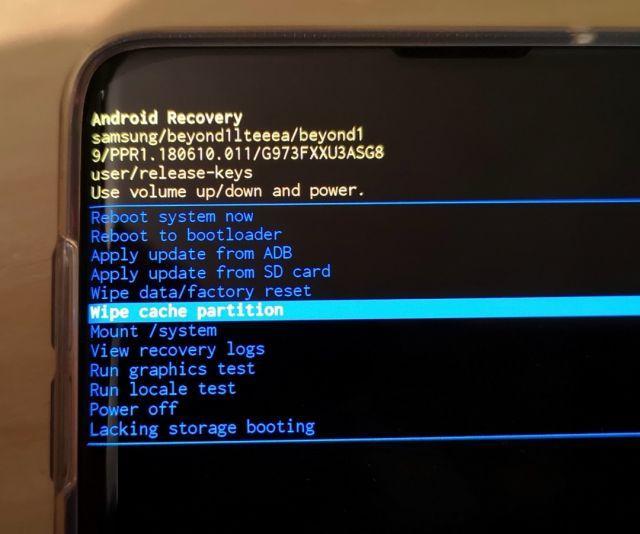
3. When the android logo appears, it means that your phone has booted into recovery mode and is getting ready to load important system commands.
4. After a short while, you will see the Android Recovery menu options, which include Wipe Cache Partition.
5. You can navigate in this menu by using the hardware keys on your device. To scroll to Wipe Cache Partition, press the volume down button several times until you see the Wipe Cache Partition command line highlighted. Then press the Bixby / Power button on your smartphone to confirm.
6. Now mark the operation with "Yes" by using the hardware keys again.
The Samsung Galaxy S22 will now perform the deletion of the cache partition, which usually only takes a few seconds.
The recovery menu will then be displayed again. Now select "Reboot Now" at the beginning and confirm by pressing the power button. This will now reboot the Samsung Galaxy S22.
Afterwards, the Samsung Galaxy S22 will hopefully run noticeably better and software problems will be a thing of the past. You now know how to perform the Wipe Cache Partition on the Samsung Galaxy S22.
{tag}link rel="alternate" href="https://www.spickipedia.com/index.php/samsung-galaxy-s22/samsung-galaxy-s22-wipe-cache-partition-durchfuehren-so-geht-s.html" hreflang="x-default" {/tag}
{tag}link rel="alternate" href="https://www.spickipedia.com/index.php/samsung-galaxy-s22/samsung-galaxy-s22-wipe-cache-partition-durchfuehren-so-geht-s.html" hreflang="de" {/tag}
{tag}link rel="alternate" href="https://www.spickipedia.com/en/smartphones/samsung/samsung-galaxy-s22/how-to-perform-a-samsung-galaxy-s22-wipe-cache-partition" hreflang="en" {/tag}
{tag}link rel="alternate" href="https://www.spickipedia.com/fr/smartphones/samsung/samsung-galaxy-s22/samsung-galaxy-s22-comment-effectuer-une-partition-wipe-cache" hreflang="fr" {/tag}
{tag}link rel="alternate" href="https://www.spickipedia.com/es/smartphones/samsung/samsung-galaxy-s22/samsung-galaxy-s22-como-realizar-un-borrado-de-la-particion-de-cache" hreflang="es" {/tag}
Comments